Saturday, February 23, 2013

Placemats

I am not a quilter. I have never been a quilter and I have no desire to be a quilter. I'm one of life's eyeballers, I lack the precision to be a quilter. My grandmother was a successful quilter so clearly the family isn't entirely devoid of the precision gene, but it certainly skipped me.


My mother asked me to make some new placemats. Because I'm not a quilter, I wasn't planning on sewing them. I had visions of crocheted slightly lacy ovals in some nice modern looking 10ply cotton in an olive green to match the colour scheme downstairs. Until she got home one day and presented me with a bag and said 'I bought some fabric that would be perfect for the placemats!' Right. So, sewn placemats then. And I added matching coasters because I felt guilty for taking six months to make four placemats.


I kept things very simple. Two rectangles of the fabric with some batting sandwiched between, straight lines of quilting and bias tape around the edges. Even so, I'm fairly sure my grandmother was turning in her grave at some of the things I did. I rather like the handstitching though.

Sunday, February 17, 2013

Gingham Style

Because some days you wake up and think 'I want to look like a tablecloth today'.


It's a pleat-less Sorbetto in seersucker, with the Sew Weekly sleeves. More for comfy around-the-house wear than anything.

Saturday, February 9, 2013

Grownup Sorbetto

Like a lot of people I'm a big fan of Colette's Sorbetto top. I find it comfy and versatile- I can wear it tucked into a skirt or hanging out of jeans for a more casual look. It's also a good pattern for playing around with to change the look. I've made a couple of different Sorbettos now, and will be making more. I'd been planning to learn to sew clothes for a long time before I actually learnt. One day in Spotlight I was seduced by the pretties and bought 1m each of a few different fabrics for tops. Because surely a top doesn't use much fabric, right? Um. Thankfully, I can eke a Sorbetto out of 1m if I piece the back. My first two Sorbettos weren't exactly what I call grown-up clothes. So I decided to use a lovely flowery Japanese lawn to make a grownup Sorbetto.


I've been playing around with the Sew Weekly Sorbetto sleeves, changing the shape a bit to try and get the perfect sleeves for me. I think these ones are pretty close. I love them on this particular version, anyway. I was aiming for flutter sleeves until I realised that cap sleeves are more 'me'. I put the bias facing on the inside of the neckline to keep things looking simple.


I'm so in love with it I'm a little bit tempted to make a second one for when this one dies because I wear it all the time.

Tuesday, January 29, 2013

The stockings were hung...

I have a little friend who celebrated her first Christmas in 2012. I bought her some books, but I also wanted to make her something that I hoped would become a special Christmas treasure of her own in years to come. When I was young I had all the Christmas books and movies where kids hung up their stockings on Christmas eve, but back then they didn't really sell Christmas stockings in the shops here. I had my Santa sack- a Christmas pillowcase- that I left out on Christmas eve for Santa to leave presents in, and though it was more practical than a stocking it lacked the Christmassy romance of a stocking. So I asked for a Christmas stocking for Christmas. My grandmother was a keen and talented quilter, and she made a quilted stocking from a green Christmas print. It also had a lace frill around the cuff, because most seven year old girls love anything with lace.

My stocking has become one of my treasured Christmas decorations. Every year it gets hung on one of the drawer knobs on the buffet in the dining room (we've never had a house with a fireplace) alongside the little blanket-stitched felt stockings I made as Christmas crafts at primary school. My fondness for the stocking from my grandmother made me decide to make my little friend a stocking of her own. Tree decorations are fun, but there's something special about a decoration of your own that hangs by itself in its own spot. Especially if there are treats in it on Christmas morning.


I wanted it to have a bit of a whimsical vintagey (ok, kitschy, but pretty kitsch) look rather than going with the traditional red and green. I used two fat quarters (the red fabric at the cuff is also the lining) and crocheted some lace that reminded me of bells. I also embroidered her name with my standard 'it makes pretty lettering' embroidery stitch. (I think it's whipped back stitch. But don't quote me on that, my knowledge of embroidery terms is pretty patchy) I was very pleased with the final result, and it was a wrench giving it away. But hopefully in years to come when my little friend is a big girl, putting up her stocking will be one of her cherished Christmas traditions.

Friday, January 25, 2013

When they sound the last all clear

I had a murder mystery set in 1941 to attend. So of course I needed to make an appropriate outfit. The 40s isn't really my era. The shoulders are a bit too angular and the hair is a bit too tall and they wore snoods. I don't like snoods. There were magnificent hats and coats, but in the record-breaking summer we've been having a hat and coat seemed slightly superfluous.

I looked at a few different dresses and basically chose the one I did out of convenience- it was available as a download. I used the 1940s Swing Dress from Sense and Sensibility. I liked it because it had the 40s look, but not so much that I'd never want to wear it again.

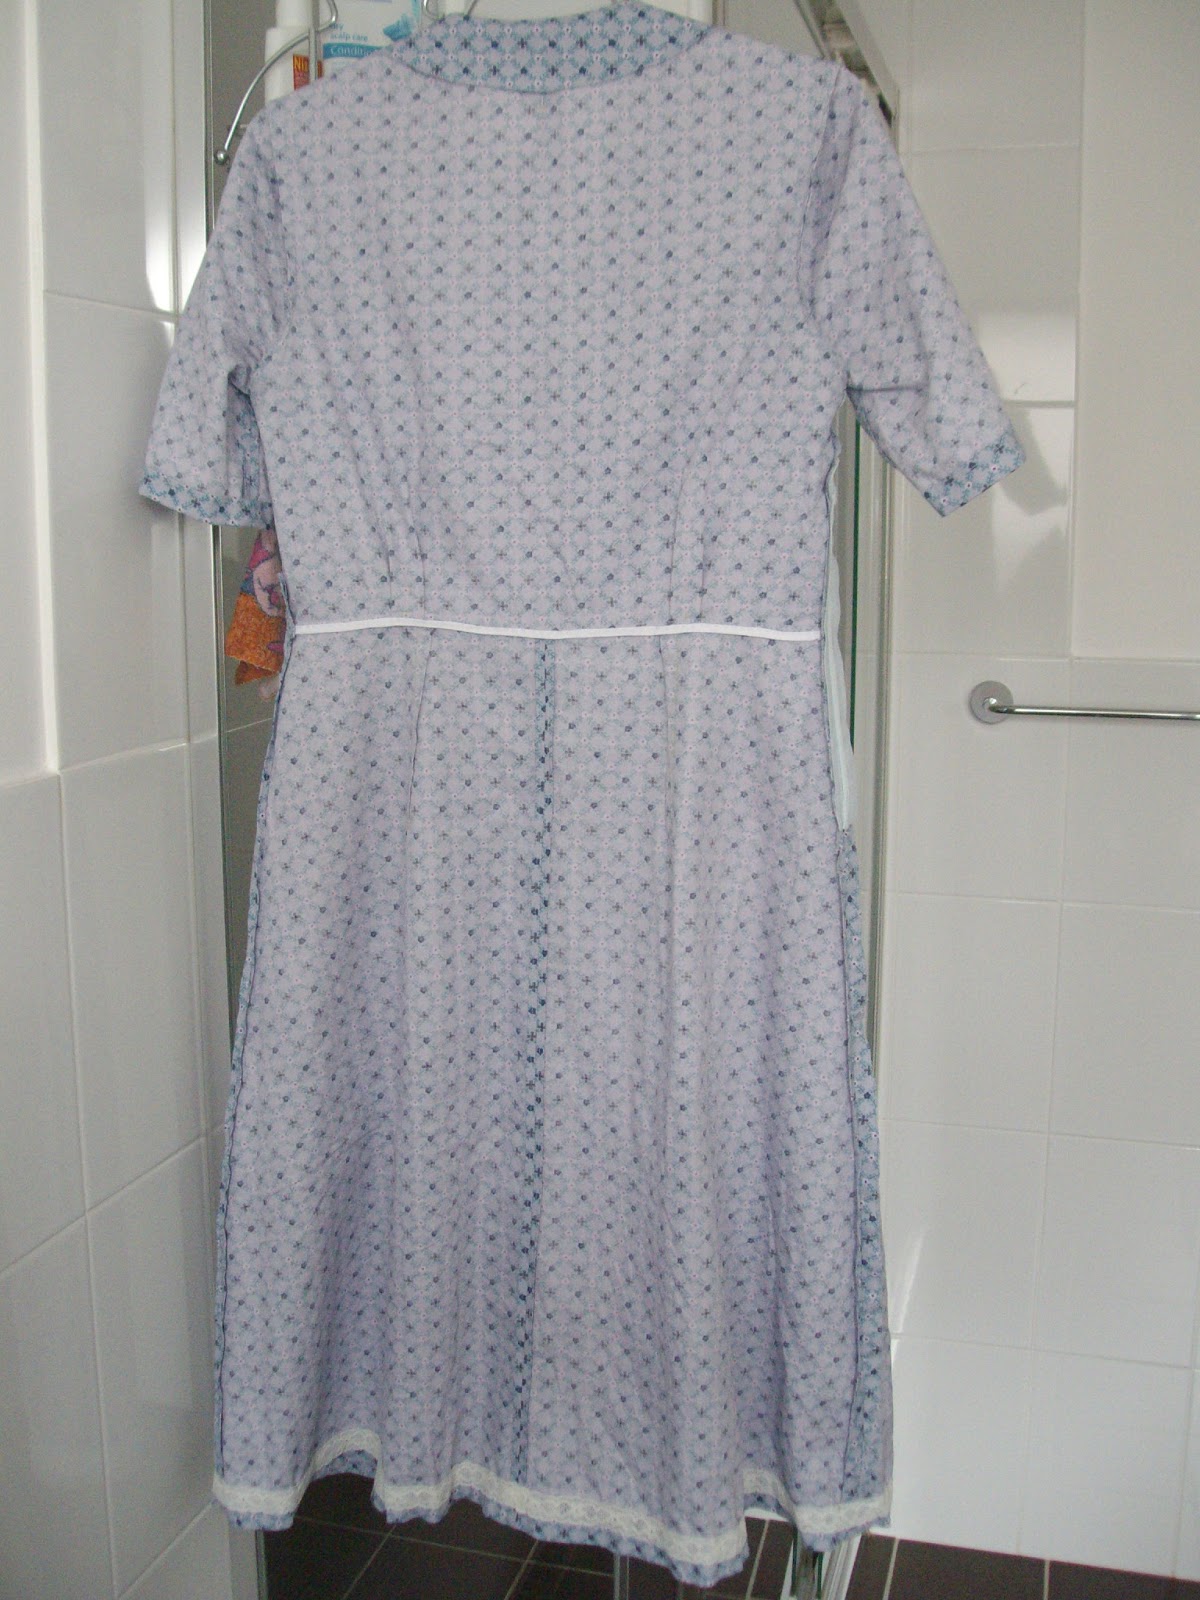
The pattern calls for a fabric with a lot of drape, but I couldn't resist the vintage reproduction cotton prints at Spotlight. I chose one that suits my taste and goes with my current clothes and shoes because I didn't want this dress to just be for dress-ups, I want it to be a regular part of my wardrobe. It didn't occur to me at the time, but choosing a small print was in keeping with the era because small non-directional prints allowed them to get a garment out of less fabric. The pattern suggests a button or brooch to close the gap at the neckline, and when I went though my vintage button stash I found one that matched perfectly.


The dress was fairly easy to sew, but the instructions for the yoke were not easy to follow. After an afternoon tearing my hair out I did some exploring on the internet and found Casey's Swing Dress Sew Along, which had a lovely simple picture tutorial for assembling the yoke. And the order in which she did it made sense, unlike the order described in the instructions.

The dress is designed for ladies with a long torso, and I am not one of these ladies. So I took two inches out of the bodice pieces, three inches out of the skirt and an inch out of the midsection piece. Casey included a section on adjusting the sleeve to fit the armscye so I did that as well. I was also inspired by Casey's sew a long to add patch pockets. Patch pockets are a lovey feature of vintage clothing that are far too rare these days, and I can't stand things without pockets. I also thought they fitted well with my character in the murder mystery.


My character was a munitions factory worker, and the local ARP warden. She had a husband fighting overseas and she was fiercely patriotic. I decided she was very practical and big on the make do and mend, but she was also keen to keep up morale by looking her best despite the grim times. I assembled the rest of my outfit around this idea- I wore brown Oxfords and tied my hair back with a scarf. My hair is too short for victory rolls and after some experimenting I discovered my hair doesn't do sleek 1940s curls, but on the night of the party it was in an obliging mood and I managed to get the front into a few semi-upright pin curls. Again, this was in keeping with my character because a munitions worker come air raid warden doesn't have much time to do her hair. I cheated and wore actual stockings because I was worried painting my legs with tea and drawing on seams would worry my very sensitive skin.


I'm very happy with the finished dress. The fit is probably my best yet, and the finishing on the inside is neater than usual too. I hand sewed the sleeve cuffs and I used lace hem tape to finish the hem by hand. I also managed to get the invisibly zipper in neatly, although I should have used a longer zipper than the pattern called for- getting this dress on and off is an adventure. Once it's on it's a comfortable dress though, with a very satisfying swish as I walk.


By chance someone I follow on Pinterest pinned a magazine pattern from 1941 for a gas mask bag, so I used that to make myself a little bag to carry odds and ends on the night. (Including the war sock WIP I took along and knitted during the party. Oh yes, I am a nerd and proud of it.)


I used cotton with iron on interfacing with the outer fabric, and lined it with felt to give it more body. The 'V for Victory' badge is a replica of a badge sold by the Australian Comforts Fund in WWII.


Tuesday, January 22, 2013

Hello internet!

It's been a while since I've had a blog, and I admit that I'm not the most diligent blogger. But I enjoy reading other people's sewing blogs and I wanted a place to talk about my own sewing shenanigans. I could waffle on about myself or what my plans for this blog are but I'm not overly keen on the sound of my own voice so I'll start as I mean to go on and talk about sewing.

I wanted a new dress for Christmas day. A dress that's a bit different to what I'd normally wear. A party dress. I made Colette's Crepe, using the sweetheart neckline and the contrast waist tie. I admit it isn't the most flattering shape on me, but I still love this dress all the same.


(Contrary to what the photo suggests I'm not severely jaundiced... since getting a puppy it's become increasingly difficult to find places to take photos where she won't crash tackle the tripod and eat the camera. I'm restricted to places she isn't allowed, and those places all have bad light)

Being a gal who is short of stature and torso, I made my usual dress modifications and shortened the bodice and the skirt. The only other main change I made from the pattern was to put flat piping around the neckline and armholes because grey isn't the best colour next to my skin. This wasn't the most thought-out decision ever- I was too busy thinking about how nice it would look to think about how annoying it would be to do, but I got there and I do love how it looks.


The fabric is a cotton lawn (I think) from Spotlight, and the contrast is quilting cotton from Spotlight. It is a bit stiff for the bow, but the colour was a higher priority because really, who can tie their own sash neatly anyway?